Blog Archives

October 15, 2014

Non-Ferrous Metal Recycling – Challenges and Outlook

Tom Stanek

Non-ferrous metals – aluminum, copper, lead, nickel, zinc and tin – do not degrade during the recycling process and thus can be recycled an infinite number of times. Thus, nonferrous recovery and recycling has become increasingly important – both domestically and globally.

According to ISRI’s “Nonferrous Scrap Metal Market Trends” presentation, nonferrous accounted for nearly 70% of total U.S. scrap recycling earnings in 2011.

Some interesting stats (provided by the ISRI in their fact sheet):


  • The US annually recycles enough copper to provide the copper content for 25,000 Statues of Liberty.
  • In 2011, the US recycled enough aluminum cans to save the equivalent of 17 million barrels of gasoline – enough to fuel more than one million vehicles on the road for 12 months.
  • A used aluminum can is recycled and back on the grocery shelf in as little as 60 days.


In 2012, more than 9 million metric tons of nonferrous scrap was processed in the US in from various sources – with an estimated value of $49 billion.

This scrap is then used domestically –and exported globally to over 100 countries. A $14 billion dollar industry, scrap is exported to China, Canada, Mexico, Japan and others – with China being the number one importer. According to the ISRI, from 2000 to 2011, NF scrap exports to China increased from $165M to $3.5 billion.

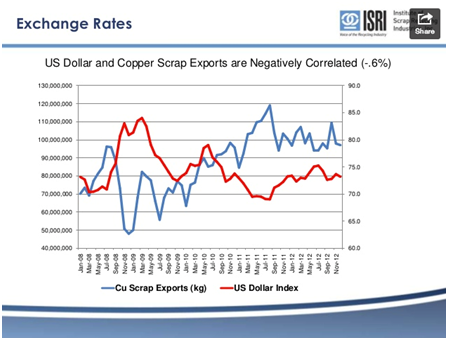
However, while NF scrap recovery in the US is booming, prices have fallen on exported NF scrap due to uncertainties including the US budget and debt ceiling challenges, exchange rate volatility (as seen in the screenshot below for copper), and global demand and supply.

USDvCuScrapExp


The pendulum may be swinging back towards less export / more domestic consumption.  USA recyclers want to see domestic consumers return to avoid transpiration, regulatory, currency, and ‘market downgrades.’  As North American manufacturing efficiencies tweak up, domestic secondary metal producers will be right behind them.

What this means for the small metals recycler

 INNOVATION REWARDEDRecyclers that maintain their flexibility among markets will benefit.  They need the largest group of buyers and the most markets to maximize revenue and consistent sales.

Strive for quality – be able to produce the next level of quality in short order.  The next ‘Operating Green Fence’ can turn a market in short order.  Be ready to meet domestic quality requirements when local markets come looking.

Innovation is rewarded – Tailoring grades to meet local markets develops your niche and often earns you a steady buyer.  X-ray sorting your zorba in to cast and sheet grades (making ISRI Grade Tweak) or separating out insulated wire adds value every day.

Flexibility will help you overcome disruptions in buyers, logistics, and currency.

October 6, 2014

Infrared Camera Positions for Shredder Infeed

Tom Stanek

Why use an infrared (IR) camera at your shredder infeed?  They do pay for themselves in short order with more tons per hour and less delay time over the course of a shift.  And there are ways to keep them out of harm’s way.

Damp and wet system shredders produce a fair amount of steam to accomplish their goals for dust control and regulating the mill box environment.  Get the dew point close to the air temp and you have a lot of steam, really obscuring the view of the feed chute.

One solution is the infrared camera to peer through the steam.  The heat from the shredder lights up the view from behind, creating a back lighted view of what’s in front of the heat.  That would be your feed stock in the feed chute.

While you don’t have to see what’s in front of the DFR, it is extremely helpful to avoid jams and underfeed minutes to the mill.  Keeping the feeder rolling and the mill box full is what it’s all about.  Pencil in the total minutes of non productive time with feed issues against the cost of the camera system, and you will find the cost of a camera reasonable.

A direct camera alignment takes in a full heat signature and gives the best camera image.  But the direct mount is also subject to direct damage.  Fortunately new  camera’s are more sensitive and allow for some alternate mounting methods.

View 1 is the direct mount, with full heat ‘lighting up’ the scrap in front of it.  Bright and sharp views, but hard to maintain and service.

View 2 is the reflected side mount.  The heat signature can be bounced off a polished reflective surface and seen by the camera safely mounted to the side.  A stainless sheet with adjustable mount works well.  We’ve heard of commercial flat screen TV brackets working well to adjust the reflector.  The camera is out of harm’s way, but you need a high enough mounting point for the reflector to keep it clear of the scrap moving over the infeed conveyor.

IR Views

IR Camera Positions


View 3 is a side mounted camera.  New IR systems are sensitive enough to present the scrap profile in front of the feed rollers even from a side view.  The camera is very much out of harm’s way, but  you need a tall mount to look over the side of the feed chute.

The side mount is often the easiest mount, close to platform or protective screen, with less cable run, and easy access.  How does it look?  See the video below.   This camera is a FLIR model A300 with 17mm lens provided as a package by Shredder Vision.

July 30, 2014

K2 Castings Gets a New Look and a New Website

Tom Stanek

K2 Castings does much more than provide long wearing shredder wear parts. Ben Guerrero and I also provide yard owners and operators advice about how to improve shredder efficiencies – especially as yards move more non-ferrous.

We also project manage major shredder consulting projects – everything from overseeing multi-million dollar new construction projects to the installation of “mega class” shredders.

With this new website, you’ll learn how we can help you in all facets of your shredder operation.

Wear Parts – In this section you’ll find our full range of “runs tough, wears long” shredder parts – from hammers and pin protectors to grates and liners.

Consulting Services – To give you a better overview of how we can help improve your shredder efficiencies, we’ve included a project portfolio plus descriptions of our combined capabilities.

RFQ Form – Using our new request for quote form, you can upload a photo of your shredder wear part or you can send us your dimensions and then we’ll take it from there.

We’ve also updated our blog where you can find shredders for sale as well as shredder tips for getting more from your operation.

Take a look around and let us know what you think!

February 3, 2014

Scrap Yard Safety on Stairs and Inclines

Tom Stanek

Often with safety in scrap yards, the small things are taken for granted.  The tactile edge on stairways is one of those things.  Adding a slightly raised and well defined edge to the edge of stairs makes all the difference in the world.  They are definitely an improvement to outdoor machinery installations, such as scrap metal shredding plants.

A simple scrap yard solution to increase the tactile edge on stairs and footing on inclines is to add small rebar or flat bar as pictured.  The profile of both edges is small enough to avoid trips, yet tall enough to provide traction to steel grating or stairs.

Traction Bars

Traction Bars

Low cost, easy to install, and easy to maintain.  Adding them to your machinery installation will enhance worker confidence on stairs and inclines.  You need your team on the job, not out with slips and falls.

August 19, 2013

Where Scrap Goes After the Recycling Bin

Tom Stanek

The Atlantic magazine features an informative story about recycling scrap metals.  It profiles the Louis Padnos Company, a generations old scrap metal processor in Holland, Michigan.  The story is a good overview of our industry by James Fallows entitled Holland: Where Things Go After the Recycling Bin.

Scrap metal recycling is rooted in family run operations all over America.  Most of those business continue to evolve in size and scale, with impressive machinery, environmental stewardship, and leading technology.  All  while maintaining the local relationships, knowledge, and the neighborly approach that built the business over decades.

A successful processor operates a large fleet of service and delivery trucks, material handling equipment, and high powered metal shredders, steel shearing machines, baling presses, and sorting equipment.  They sell recycled metals on a national and world market, following commodity prices, and trading across time zones.  The mix of skills and experience needed the run a recycling business is unique.

You’ll enjoy Mr. Fallows profile story above.  For a more in depth look, consider Adam Minter’s Junkyard Plant.  More information on the scrap metal industry can be found at the industry association site ISRI.

December 6, 2012

Shrink Fit Coupling Removal

Tom Stanek

High torque drive couplings usually involve a shrink fit.  The coupling is machined with a smaller diameter than the mating shaft.  The coupling is heated 300-400 degrees hotter, expands and can be slipped onto the drive shaft.  It cools, shrinks in diameter, and a tight mechanical fit is accomplished (with keyways or splines as well).

You may have to remove a shrink fit coupling when changing out drive motors or rotors.  Your manufacturer’s rep can get you some advice on the pulling force and strength needed for a successful removal.  Without adequate set up, you’ll bend or snap rods, and be left with hours of time to shed enough heat before you can work on the unit again for another attempt.

  1. You’ll need a lifting device and rigging to hold up several hundred pounds of coupling as you slide it off the shaft.
  2. 6 to 8 full diameter threaded rods seated full depth in your coupling’s end holes, and a few dozen nuts.  Use grade 8 rod (150 ksi tensile) to give you full strength and minimal elongation.
  3. 2 inch thick backing plate
  4. 12-20 tons of jacking force.  Hydraulic jack (s) and enough jack stroke to pull off the coupling.  This may require a stub shaft insert if you the jack stroke is less than the coupling length.
  5. Torches and heating tips.  Rosebud heating tips of proper size (8 or 10) are important.  Using both propane and oxy acetylene torches is wise.  Acetylene burns hotter and there is limited space to apply torches to the coupling.  Make sure you have enough gases on hand in case you need more than one attempt to remove the coupling.
  6. Fire retardant blankets
  7. A clean and clear work area
  8. Fire fighting gear, a clear work area, and heat resistant PPE for personnel
  9. Your safety program may require a hot work permit

The key item is to heat the coupling quickly, so it expands before the shaft it’s mounted on heats up and expands as well.  The difference in temps for allows for expansion.  Also, excessive heat in the shaft can lead to damage of bearings, seals, and other components.

Coupling-Change

Always let things air cool.  Never cool with water or gases like a CO2 fire extinguishers.  If you have a fire emergency, do what you need to do to minimize loss of property or life.  However quenching with water or anything else would likely damage the coupling or shaft steel.

August 12, 2012

What the DFR?

Tom Stanek

Weld On DFR Tooth

Now is a great time to pay a little attention to your double feed roll (DFR). 

Your feeding device is one of the most important productivity factors in your scrap metal shredding system. The feeder is tasked with adding feed stock to the shredder at a controlled rate, both pushing it in and holding it back. 

It cannot be effective without traction aides on the roller surface. Lateral bars and teeth welded to the rolls grab and move material and have sharp edges to assist. Edges are key. Rounded off lateral grab bars and teeth just don’t work as well.

Ideally, you have replacement feed rollers on the ground, ready to swap in place or have a slick one piece cast roller you can replace.  Many DFR units do not. You may not have the time for a large scale DFR renewal.

Enter the K2 Weld on Tooth.

You can renew in place replacing lateral bars and adding weld on teeth to the feed roll.  Adding them over a few maintenance shifts can give you the surfaces and edges you need to grab and hold tin, bales, and loose scrap, getting your feed rate closer to new. 

Fight less on the feed ramp, feed more in the shredder.  Give us a call for a set.

July 18, 2012

Market Slowdowns Present Shredder Maintenance Opportunities

Tom Stanek

As we see markets and scrap flow drop, now is a great time to perform the maintenance you don’t normally get a chance to cover as thoroughly.

Feed Rolls

Time to get them cleaned up. Cut all the extra scrap accumulations away from the side to prevent bearing damage. Once they are cleaned it is a good time to check for cracks around the shaft.  Build up roller edges. Consider K2 Weld On Feeder Teeth to restore edges and ability to efficiency grab and grip feedstock.

Grate Supports

For those shredders with welded-in side liner grate supports, now is a good time to pull the grates and check for cracks in the welds to the side walls. Also, build up the supports to make sure your grates fit correctly. Too much of a gap and the grates will bounce during production and cause them to break or warp.

Shredder Box

Pressure wash it down inside and out. Then check for cracks in the housing. Replace any loose liner bolts which cannot be tightened.  Be sure to check your hinge pin bushings, pin, etc. Don’t forget to check your safety retainer pin holes and pins themselves to make sure they are not too worn. You want a snug fit.

Electrical

Schedule a vac and clean for your switchgear, infrared scans for possible problem spots.  Drain and clean you liquid rheostat tank if you got one.  Wash down air coolers.  Change air filter media.

In Feed Conveyor

Check your upper drive sprockets and replace any missing or worn segments. Look at the reverse side of your flights for wear from the rails it rides on. If you see some deep gouges on the back of the flights, it is a sign it is time to replace the rails.  Clear out scrap caught up in the chain and finally take the slack out of that sagging chain.

Wear Parts

Clean up and consolidate your parts inventory.  Find a way to work in parts with a bit a life left in them.  Adjust your order times, but don’t hold back too long.  As soon as it gets busy, everyone orders.  Be on the front end of that upswing.  Order earlier enough!

These are just a few of the things you can check. A little fresh paint will also do the shredder good. 

December 19, 2011

Scrap Yard Holiday Shutdown

Tom Stanek

It is the holiday season!  We at K2 Castings wish your team the best. To ensure a safe and happy holiday season, take a few steps to prepare for extended shutdown at your yard.

  • Lock down and secure for fuel tanks, equipment, and metals storage.  Check your perimeter fencing and gates.
  • Ship out shredder fluff and leave an empty bin.
  • If eliminating the fluff pile is not an option, wet them down.
  • Park mobile equipment  away from potential fire hazards.
  • Have nothing stacked against your infeed conveyor.
  • Empty out waste oil, and other potential flammable items.
  • Run a quick check of the shop and vital areas for potential problems. Make your checks early in the day or week, so corrections can happen before shutdown.

Don’t forget some basic home safety tips that apply to office Christmas decorations as well.

  • Fire Safety.Remember to follow a few simple rules to prevent fires at your home over the holidays.
  • Do not plug too many things in to one outlet and risk an electrical fire. If you trip a breaker, there is a reason why.
  • If using a fresh tree, make sure it is kept watered the entire season. Be sure to take it down as soon as possible after the holiday season is over. Many countries have “Boxing Day” the day after Christmas for a reason.
  • Make sure you have a small multi use rated fire extinguisher on each level of your home and in the garage.
  • Do not use electrical cords which have been damaged.
  • Always turn off all tree lights when no one is home or when going to bed.
  • Get rid of wrapping paper and any other potential fire hazards as soon as possible.
June 25, 2011

Shredder Motor Change Out

Tom Stanek

Sailors have been known to wish for ‘fair winds and following seas’ as a farewell to respected colleagues.  Shredder foremen sometimes say farewell with “may you never burn up a motor before a vacation week.”  Okay, we made that up.  Shredder foremen don’t use flowery language.  But in the shorthand between those that shred steel for a living, it’s more like a ‘hey, hope you don’t have to use your spare.’  The point it is, those operators that have lost a motor understand it’s the start of a long week.  How do you make sure it’s no worse than a week?  Planning.  Here are the basics.

  1. Identify your spare. If you don’t own a spare electric motor, find one.  They don’t stock them at your local Grainger.  There are a lot of used motors out there.
  2. Is the spare stored and ready? The internal heaters need to be energized, and someone needs to turn it monthly, especially if it’s a wound rotor.
  3. Transport and lift. Many have their motors stored off site.  Get the wheels in motion early with transport to the shredder.  Have the weights and dimensions ready to give to your transportation broker.  How should it be rigged and lifted?  What crane companies and choices are there? What kind of swing radius is available?  Have these details on file so you can line up trucks and cranes in short order instead of making 20 phone calls at the last minute.
  4. Mounting: If it’s a direct replacement, be sure you have the tools to unbolt it. You’ll want to check the security of the mounting frame to the foundation once the old motor it off. If you have a loose stud in the foundation, maybe you have time to remove and grout in a replacement. If it’s not a direct fit replacement, you may have to adapt the mounting frame. If possible, you’ve made the new frame early on for the spare.  Have fasteners, wrenches, and shackles, and port-a-powers or know a company that does. If you change the mounting base, the old base may be grouted in place. You’ll need to chip out the old grout, clean the foundation, and have new grout in stock or be sure of your source. Any old grout will not work. It’s very strong epoxy that will not settle or crack. Chipping it out isn’t a simple job. Have the tools to do it or at least a list of them ready when the need arises. Check with your motor vendor or service rep about shimming in the new motor frame base and avoiding grout. The decision will be based on the conditions at the time.
  5. Electrical connection. If the spare is not a direct replacement, is the starter, LR tank, and other items compatible? Do you have sufficient cooling air volume for this motor? Will the stator & rotor main conductors match the motor connecting locations? Heavy conductors do not flex well. If you change styles of motor, you may have a major wiring job ahead of you. Do the connecting lugs fit in the electrical terminations? What about the changes for temp RTD’s, RPM monitor, internal heaters? How about wiring in the power factor correction capacitor bank? Any pre-planning and prep you can do here can lessen days of OT electrical rates.
  6. Cooling air or water. You may need a new sheet metal exhaust duct or alter the water piping (depending on air or liquid cooling). Be ready to change supply air filters or flush your cooling system if time allows.
  7. Coupling connection. Have the tools and parts ready to disconnect the motor from your drive line. Check alignment of the new motor to main dimensions required of your installation. The motor axis and rotor axis should be level and parallel to each other, but not necessarily in line. Your shredder manufacturer and drive line specialist can advise the offset specs.
  8. During the change out, find out what may have caused the motor failure. For example, a seized drive shaft universal joint may have caused a motor bearing failure. If you don’t correct that problem, you may have the same motor bearing failure with the replacement motor.
  9. Having the plan in place prior to the problem will help you get back on line sooner. It may also let you delegate the initial steps to your acting foreman while you try to avoid cutting short a vacation week. That said, may you never burn up a motor before a vacation week.

Roof-Hatch-Exhaust-Duct-11-300x225Motor-Lift-Out-1-300x225
Root-of-the-problem-1-300x225