Blog

December 6, 2012

Shrink Fit Coupling Removal

Tom Stanek

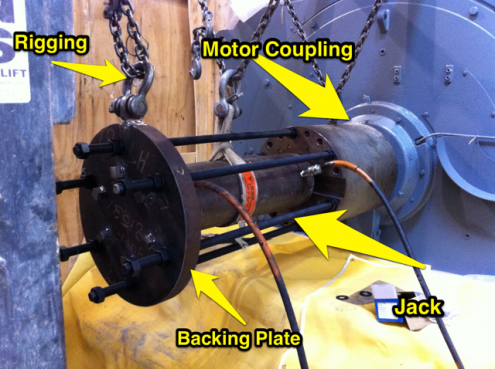
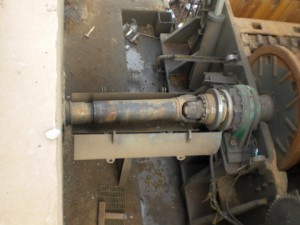
High torque drive couplings usually involve a shrink fit.  The coupling is machined with a smaller diameter than the mating shaft.  The coupling is heated 300-400 degrees hotter, expands and can be slipped onto the drive shaft.  It cools, shrinks in diameter, and a tight mechanical fit is accomplished (with keyways or splines as well).

You may have to remove a shrink fit coupling when changing out drive motors or rotors.  Your manufacturer’s rep can get you some advice on the pulling force and strength needed for a successful removal.  Without adequate set up, you’ll bend or snap rods, and be left with hours of time to shed enough heat before you can work on the unit again for another attempt.

  1. You’ll need a lifting device and rigging to hold up several hundred pounds of coupling as you slide it off the shaft.
  2. 6 to 8 full diameter threaded rods seated full depth in your coupling’s end holes, and a few dozen nuts.  Use grade 8 rod (150 ksi tensile) to give you full strength and minimal elongation.
  3. 2 inch thick backing plate
  4. 12-20 tons of jacking force.  Hydraulic jack (s) and enough jack stroke to pull off the coupling.  This may require a stub shaft insert if you the jack stroke is less than the coupling length.
  5. Torches and heating tips.  Rosebud heating tips of proper size (8 or 10) are important.  Using both propane and oxy acetylene torches is wise.  Acetylene burns hotter and there is limited space to apply torches to the coupling.  Make sure you have enough gases on hand in case you need more than one attempt to remove the coupling.
  6. Fire retardant blankets
  7. A clean and clear work area
  8. Fire fighting gear, a clear work area, and heat resistant PPE for personnel
  9. Your safety program may require a hot work permit

The key item is to heat the coupling quickly, so it expands before the shaft it’s mounted on heats up and expands as well.  The difference in temps for allows for expansion.  Also, excessive heat in the shaft can lead to damage of bearings, seals, and other components.

Coupling-Change

Always let things air cool.  Never cool with water or gases like a CO2 fire extinguishers.  If you have a fire emergency, do what you need to do to minimize loss of property or life.  However quenching with water or anything else would likely damage the coupling or shaft steel.

August 12, 2012

What the DFR?

Tom Stanek

Weld On DFR Tooth

Now is a great time to pay a little attention to your double feed roll (DFR). 

Your feeding device is one of the most important productivity factors in your scrap metal shredding system. The feeder is tasked with adding feed stock to the shredder at a controlled rate, both pushing it in and holding it back. 

It cannot be effective without traction aides on the roller surface. Lateral bars and teeth welded to the rolls grab and move material and have sharp edges to assist. Edges are key. Rounded off lateral grab bars and teeth just don’t work as well.

Ideally, you have replacement feed rollers on the ground, ready to swap in place or have a slick one piece cast roller you can replace.  Many DFR units do not. You may not have the time for a large scale DFR renewal.

Enter the K2 Weld on Tooth.

You can renew in place replacing lateral bars and adding weld on teeth to the feed roll.  Adding them over a few maintenance shifts can give you the surfaces and edges you need to grab and hold tin, bales, and loose scrap, getting your feed rate closer to new. 

Fight less on the feed ramp, feed more in the shredder.  Give us a call for a set.

August 1, 2012

Organize Your Wear Parts Storage Area

Ben Guerrero
shredder hammers

Wear Parts Inventory

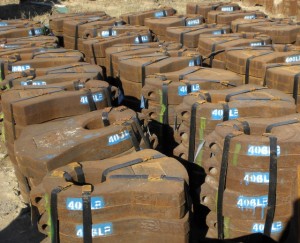
Ever have a liner break before its normal replacement time?  Then when you go to replace it you don’t have a spare?  It happens from time to time.  First, it’s best to use K2 Castings shredder wear liners, second don’t wear your liners too thin, third, replace loose liner bolts, and fourth, keep your storage area organized so everyone has a clear view of what’s on hand and where to find it.

Here are some quick tips on keeping your shredder wear parts inventory working to your advantage.

  1.  Create a listing of all the wear parts required and quantities on hand to get an accurate starting point. Every time maintenance is performed make sure to record the parts used and deduct it from the original total. It is a simple concept, but very hard to stay consistent.  Monthly inventory counts help you avoid surprises.
  2. Organize the spare parts area for clear viewing and easy counts.  Burying parts on top of one another will make inventory checks difficult.  Try to keep your storage area away from the shredder.  Sometimes scrap and debris which can cover your parts if they are stored too close to the shredding process.
  3. If you have the room, designate a spot for each part and paint the part number on the pavement. This will aid in keeping track by having a visual reference when a part has been used. If you are fortunate to have a building for your parts, you can line them up and hang placards with the part numbers on the wall.
  4.  Keep used parts in completely different areas to avoid parts confusion. If you are using worn hammers as back ups or pin protectors, weigh and mark them, then stack them on a pallet for easy access.
  5.  Keep parts rotated using the oldest parts first (FIFO) to keep your wear parts within your replacement warranty time limits. Parts have heat numbers which the foundries keep on file in case there is a possible casting problem.

Easy to count and access inventory

Hope this helps with some simple ideas to keep from getting caught short.

July 18, 2012

Market Slowdowns Present Shredder Maintenance Opportunities

Tom Stanek

As we see markets and scrap flow drop, now is a great time to perform the maintenance you don’t normally get a chance to cover as thoroughly.

Feed Rolls

Time to get them cleaned up. Cut all the extra scrap accumulations away from the side to prevent bearing damage. Once they are cleaned it is a good time to check for cracks around the shaft.  Build up roller edges. Consider K2 Weld On Feeder Teeth to restore edges and ability to efficiency grab and grip feedstock.

Grate Supports

For those shredders with welded-in side liner grate supports, now is a good time to pull the grates and check for cracks in the welds to the side walls. Also, build up the supports to make sure your grates fit correctly. Too much of a gap and the grates will bounce during production and cause them to break or warp.

Shredder Box

Pressure wash it down inside and out. Then check for cracks in the housing. Replace any loose liner bolts which cannot be tightened.  Be sure to check your hinge pin bushings, pin, etc. Don’t forget to check your safety retainer pin holes and pins themselves to make sure they are not too worn. You want a snug fit.

Electrical

Schedule a vac and clean for your switchgear, infrared scans for possible problem spots.  Drain and clean you liquid rheostat tank if you got one.  Wash down air coolers.  Change air filter media.

In Feed Conveyor

Check your upper drive sprockets and replace any missing or worn segments. Look at the reverse side of your flights for wear from the rails it rides on. If you see some deep gouges on the back of the flights, it is a sign it is time to replace the rails.  Clear out scrap caught up in the chain and finally take the slack out of that sagging chain.

Wear Parts

Clean up and consolidate your parts inventory.  Find a way to work in parts with a bit a life left in them.  Adjust your order times, but don’t hold back too long.  As soon as it gets busy, everyone orders.  Be on the front end of that upswing.  Order earlier enough!

These are just a few of the things you can check. A little fresh paint will also do the shredder good. 

December 19, 2011

Holiday Season Ideas

Ben Guerrero

We thought we’d pass along some ideas a friend brought to our attention about the holiday season.

Too many kids toys from previous years? Try the following.

Check for children’s homes. Children’s homes (orphanages) will often accept used toys.  Help bring joy to these children in tough times.  The holidays can be especially difficult for them.

Take some toys to a shelter. Many shelters for homeless or abused women are open to accepting used toys.  This can also be a great “eye-opener” for kids to see those who are less fortunate and to give them the ability to help someone.

Local Charities. Although this method of giving may not be as exciting for the child, you can still make it fun by offering a reward of some sort for giving and also by explaining how the toys will help those in need.  A simple reward such as going to get ice cream or stopping at the park will go a long way with a child.  There are of course the additional tax benefits of donating to charities as well.

Donate to a hospital. Children that are fighting illness are always in need of something positive.  Be sure to check with the hospital first to see whether they accept used toys.

These are just some of the ways you can teach your kids the power of getting organized and gift giving all at the same time.  With such a bad economy and so many in need, there is really no excuse for keeping that 60-80% of clutter in your home whether it be your children’s or yours.  Free up space in your life by filling the space in someone’s heart.

WE WISH YOU A SAFE AND  HAPPY HOLIDAY.  

December 19, 2011

Scrap Yard Holiday Shutdown

Tom Stanek

It is the holiday season!  We at K2 Castings wish your team the best. To ensure a safe and happy holiday season, take a few steps to prepare for extended shutdown at your yard.

  • Lock down and secure for fuel tanks, equipment, and metals storage.  Check your perimeter fencing and gates.
  • Ship out shredder fluff and leave an empty bin.
  • If eliminating the fluff pile is not an option, wet them down.
  • Park mobile equipment  away from potential fire hazards.
  • Have nothing stacked against your infeed conveyor.
  • Empty out waste oil, and other potential flammable items.
  • Run a quick check of the shop and vital areas for potential problems. Make your checks early in the day or week, so corrections can happen before shutdown.

Don’t forget some basic home safety tips that apply to office Christmas decorations as well.

  • Fire Safety.Remember to follow a few simple rules to prevent fires at your home over the holidays.
  • Do not plug too many things in to one outlet and risk an electrical fire. If you trip a breaker, there is a reason why.
  • If using a fresh tree, make sure it is kept watered the entire season. Be sure to take it down as soon as possible after the holiday season is over. Many countries have “Boxing Day” the day after Christmas for a reason.
  • Make sure you have a small multi use rated fire extinguisher on each level of your home and in the garage.
  • Do not use electrical cords which have been damaged.
  • Always turn off all tree lights when no one is home or when going to bed.
  • Get rid of wrapping paper and any other potential fire hazards as soon as possible.
June 25, 2011

Shredder Motor Change Out

Tom Stanek

Sailors have been known to wish for ‘fair winds and following seas’ as a farewell to respected colleagues.  Shredder foremen sometimes say farewell with “may you never burn up a motor before a vacation week.”  Okay, we made that up.  Shredder foremen don’t use flowery language.  But in the shorthand between those that shred steel for a living, it’s more like a ‘hey, hope you don’t have to use your spare.’  The point it is, those operators that have lost a motor understand it’s the start of a long week.  How do you make sure it’s no worse than a week?  Planning.  Here are the basics.

  1. Identify your spare. If you don’t own a spare electric motor, find one.  They don’t stock them at your local Grainger.  There are a lot of used motors out there.
  2. Is the spare stored and ready? The internal heaters need to be energized, and someone needs to turn it monthly, especially if it’s a wound rotor.
  3. Transport and lift. Many have their motors stored off site.  Get the wheels in motion early with transport to the shredder.  Have the weights and dimensions ready to give to your transportation broker.  How should it be rigged and lifted?  What crane companies and choices are there? What kind of swing radius is available?  Have these details on file so you can line up trucks and cranes in short order instead of making 20 phone calls at the last minute.
  4. Mounting: If it’s a direct replacement, be sure you have the tools to unbolt it. You’ll want to check the security of the mounting frame to the foundation once the old motor it off. If you have a loose stud in the foundation, maybe you have time to remove and grout in a replacement. If it’s not a direct fit replacement, you may have to adapt the mounting frame. If possible, you’ve made the new frame early on for the spare.  Have fasteners, wrenches, and shackles, and port-a-powers or know a company that does. If you change the mounting base, the old base may be grouted in place. You’ll need to chip out the old grout, clean the foundation, and have new grout in stock or be sure of your source. Any old grout will not work. It’s very strong epoxy that will not settle or crack. Chipping it out isn’t a simple job. Have the tools to do it or at least a list of them ready when the need arises. Check with your motor vendor or service rep about shimming in the new motor frame base and avoiding grout. The decision will be based on the conditions at the time.
  5. Electrical connection. If the spare is not a direct replacement, is the starter, LR tank, and other items compatible? Do you have sufficient cooling air volume for this motor? Will the stator & rotor main conductors match the motor connecting locations? Heavy conductors do not flex well. If you change styles of motor, you may have a major wiring job ahead of you. Do the connecting lugs fit in the electrical terminations? What about the changes for temp RTD’s, RPM monitor, internal heaters? How about wiring in the power factor correction capacitor bank? Any pre-planning and prep you can do here can lessen days of OT electrical rates.
  6. Cooling air or water. You may need a new sheet metal exhaust duct or alter the water piping (depending on air or liquid cooling). Be ready to change supply air filters or flush your cooling system if time allows.
  7. Coupling connection. Have the tools and parts ready to disconnect the motor from your drive line. Check alignment of the new motor to main dimensions required of your installation. The motor axis and rotor axis should be level and parallel to each other, but not necessarily in line. Your shredder manufacturer and drive line specialist can advise the offset specs.
  8. During the change out, find out what may have caused the motor failure. For example, a seized drive shaft universal joint may have caused a motor bearing failure. If you don’t correct that problem, you may have the same motor bearing failure with the replacement motor.
  9. Having the plan in place prior to the problem will help you get back on line sooner. It may also let you delegate the initial steps to your acting foreman while you try to avoid cutting short a vacation week. That said, may you never burn up a motor before a vacation week.

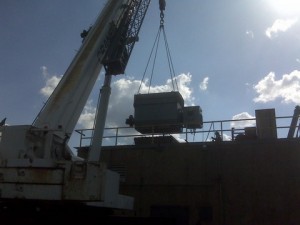
Roof-Hatch-Exhaust-Duct-11-300x225Motor-Lift-Out-1-300x225
Root-of-the-problem-1-300x225

April 8, 2011

2011 ISRI Convention

Ben Guerrero

We appreciate all those at the 2011 ISRI show who stopped by to talk wear parts and shredders with us.  Thanks for your interest and a great convention.  We look forward to helping many of you get wear parts that work harder for you into your machines and increase non-ferrous yields with our K2 Recovery GratesTM.

August 20, 2010

Pin Protectors are Vital Wear Parts

Tom Stanek

Disk rotor scrap metal shredders run with 1-2 hammers in each row and cover the remaining positions with pin protectors.  Are pin protectors important wear parts that contribute to wear life? Absolutely.

The role of pin protectors:

  1. Job one is protecting expensive hammer pins where no hammer exists.
  2. They assist in crushing and densifying scrap in the shredder.
  3. They help protect the rotor disks, limiting disk wear.
  4. They help maintain rotational energy of the rotor.  The weight of many pin protectors on the outer edges of the rotor make up the ‘flywheel’ that is your shredder rotor.

When new, pin protectors should extend about 2-4 inches past the disk.  Disk rotors are more forgiving on balance, but the closer you can match weights of opposing rows of pins and hammers, the better off you will be.  Some operators have favored larger protectors as a way to help gain rotating mass and “store” more rotational energy.  As with everything, there are limits.  Your shredder manufacturer can give you guidance on how much is too much for your mill size, rotor, and drive line.

Bottom line, don’t neglect pin protectors.  They are not just ‘along for the ride.’  With a little tweaking on size and weight, they can help maintain rotational energy and help save wear on your inner disks as well. Give us a call and let us help you find an edge in improved performance.

August 10, 2010

Hammer Patterns for Disk Rotors

Tom Stanek

Scrap metal shredder operators have many hammer patterns and methods for extending hammer wear life.  Disk rotors offer more combinations than spider rotors for most operators.

Disk rotors come in 10 or 11 disk models, often with 6 pin positions. You can use a 10, 12, or 14 hammer pattern to meet your production requirements. The balance of the openings are filled by pin protectors. Proper rotation of the hammers to different positions is the key to longer wear life and consistent production levels.

Some operators rotate in a few new hammers each maintenance cycle and keep mill output consistent.  Others run in sets.  They rotate edges and positions to achieve maximum hammer wear, then replace the set.  Extra hammers on the end positions help move material away from the side liners to reduce wear.  Extra hammers in the center position are preferred at times to get more work edges where the action is.

The pattern and rotation that works best depends on these factors:

  1. Feedstock mix
  2. Side liner wear
  3. Wear pattern on bottom grates
  4. Unusual wear on the rotor

Extra hammers benefit mills shredding a high percentage of sheet iron and appliances.  If shredding auto bodies, fewer hammers often yield positive results.  Too many hammers will impede the ability of scrap to enter the shredder, thus the upper limit of about 14 hammers mentioned earlier.  Wear on liners and grates indicate the work area.  Changing hammer positions can help distribute the material load to some degree.  High wear on your inner disks may indicate you are letting hammers and pin protectors wear too long.

As mentioned in the spider rotor post, finding your ‘sweet spot” requires a little experimentation and measurement.  If you can maintain density and recovery and use less new hammers, you’re moving in the right direction of controlling overall cost.  Don’t ignore wear parts life.  Casting costs are as real as your electric or fuel bills each month.